RD Session Host server Install Mode

Applications developed for end users of your system must be installed properly on an RD Session Host server so that they can be accessed remotely. Before you install an application on an RD Session Host server, make sure you understand any compatibility issues associated with the application when it is running in a Remote Desktop Services environment.

Make sure you install the RD Session Host role service on your server before you install any applications that users will need to run within their remote sessions or as RemoteApp programs. If you install the RD Session Host role service after you have installed your applications, the applications might not function correctly in a multi-user environment.

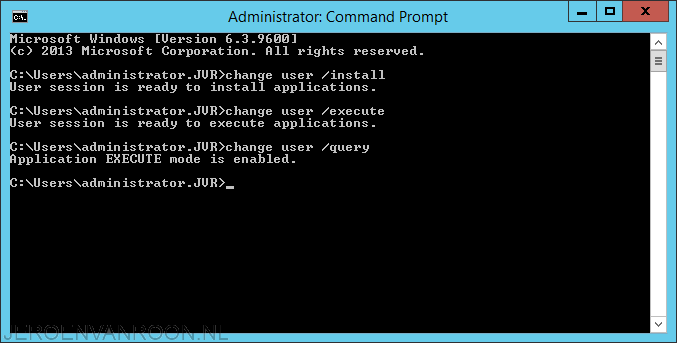
To install an end-user application on an RD Session Host server, the RD Session Host server must first be switched into a special install mode called RD-Install to ensure that the application will be able to run in a multi-user environment. After your applications have been installed on your RD Session Host server, you must switch the server back into execution mode before users can remotely connect to your server. You can switch between the install and execute modes from the command line using these commands:

  • change user /install
  • change user /execute

To determine the current install mode of your RD Session Host server, use this command:

  • change user /query

2014-10-21 21_39_04-mRemoteNG - confCons.xml


Set Network Location to Private in Windows 8.1 or Server 2012 R2

Sometimes a new Network Location gets mis-identified as Public when it should be Private, or the other way around. Changing this in the GUI is certainly possible, but the PowerShell method is faster. So let’s take advantage of the improved Windows PowerShell support in Windows 8.1 and do it quickly and easily.

2014-10-21 21_14_00-2012R2-DC02 on I5-PC - Virtual Machine Connection

First, let’s open up an elevated PowerShell window from our user session and find out what our current network location is set to:

  • Get-NetConnectionProfile

2014-10-21 21_12_20-2012R2-DC02 on I5-PC - Virtual Machine Connection

From this, we see that the problem interface has an Interface Index of 12. To change the network type execute the following command:

  • Set-NetConnectionProfile -InterfaceIndex 12 -NetworkCategory Private

2014-10-21 21_13_11-2012R2-DC02 on I5-PC - Virtual Machine Connection

The network has been changed to a Private Network.

2014-10-21 21_13_40-2012R2-DC02 on I5-PC - Virtual Machine Connection

Bulk convert old office documents to 2010 format

Last week someone told me he has 3000+ excel files that were in the .xlx format. The user was using Office 2010 and everytime they open one of the files they get the popup from office compatibility view. Because it costs them a lot of time to close the popup everytime they open a document they have asked me if there was a way to convert all files in a bulk.

I started investigating and found a tool from Microsoft that bulk converts old office documents. The following steps explain how this tool can be used:

  1. Download the Microsoft Office Migration Planning Manager from the Microsoft website and unpack the contents to c:\office.
  2. Download the Microsoft Office Compatibility Pack for Word, Excel, and PowerPoint File Formats  from the Microsoft website and install this software. This step is also required if you have already installed Office 2007/2010.
  3. Go to c:\office\Tools and edit the ofc.ini file. Remove the ‘;’ from the following line: ‘;fldr=C:\*’ and change the directory to the path where the documents are located.
  4. Run ofc.exe and the converting of the documents start. Default the coverted documents are placed in a subdirectory called ‘Converted’. This can be edited in the ofc.ini file.

This utility works with Word (doc to docx), Access databases, PowerPoint (ppt to pptx), Visio diagrams, Excel (xls to xlsx) and Microsoft Project files. The conversion may however fail for password protected documents.

MDT 2010: Automated Lite Touch Deployments

Lite Touch is an easy way to deploy Windows trough an network connection. A default Lite Touch deployment still has a lot of steps to determine during setup. To lower the steps of the Lite Touch installation wizard the ‘Customsettings.ini’ file can be edited. Follow the next steps to edit the file:

  1. Go to the MDT DeploymentWorkbench
  2. Click on Deployment Shares
  3. Right click on the deploymentshare and click properties
  4. Click on the tab ‘Rules’
  5. In the editor the rules can be added

DeploymentShareCustomsettings

I have created an example ‘Customsettings.ini’ file. In this file I have created some example entries. The bold items are settings that can be customized to match your environment. The plain text are settings that are connected to a bold line. They provide information for the setting that is set before. The example file is shown below:

[Settings]

Priority=Default
Properties=MyCustomProperty

[Default]

OSInstall=Y

SkipWizard=NO

SkipBDDWelcome=YES

UserID=administrator
UserDomain=CONTOSO
UserPassword=Pa$$w0rd

SkipTaskSequence=NO
TasksequenceID={ef6c6358-8hg9-4615-90af-d4555dc2feff}

SkipComputerName=NO
OSDComputerName=!PC-Naam-invoeren

SkipDomainMembership=YES
JoinDomain=CONTOSO
DomainAdmin=Administrator
DomainAdminDomain= CONTOSO
DomainAdminPassword=Pa$$w0rd

SkipComputerBackup=YES

SkipUserData=YES

SkipProductKey=YES

SkipPackageDisplay=YES

SkipLocaleSelection=YES
KeyboardLocale=en-GB
UserLocale=en-GB
UILanguage=en-GB
SkipTimeZone=YES
TimeZoneName=W. Europe Standard Time
TimeZone=110

SkipApplications=YES
Applications001={ef6c6358-8hg9-4615-90af-d4555dc2feff}

SkipAdminPassword=YES
AdminPassword=Pa$$w0rd

SkipCapture=YES
ComputerBackupLocation=\\ServerName\Backupfolder$\
BackupFile=Image.wim

SkipBitLocker=YES

SkipSummary=YES

SkipFinalSummary=YES